


WHAT IS ARDUINO?
The Arduino is an open-source easy-to-use hardware and software platform used to build electronics projects. It was designed for artists, designers, and others who want to incorporate physical computing into their designs without having any prerequisite engineering knowledge.
Arduino consists of a physical programmable circuit board (often referred to as a microcontroller) and a piece of software, or IDE (Integrated Development Environment) that runs on your computer, used to write and upload computer code to the physical board.
🤖 WHY ARDUINO?
The Arduino software is easy-to-use for beginners yet flexible enough for advanced users. The various advantages of using ARDUINO over other microcontrollers are:
Inexpensive: Arduino Boards are relatively cheap. If you somehow manage to damage the main component on the Arduino Uno, it can be replaced at quite an affordable price.
Cross-platform: The Arduino Software (IDE) runs on Windows, Macintosh OSX, and Linux operating systems. Most microcontroller systems are limited to Windows.
Open Source: The Arduino platform under a Creative Commons license is published as an open-source tool, available for extension by experienced programmers. The open-source community shares information, answers, projects, and teaching methods with data that are helpful for beginners
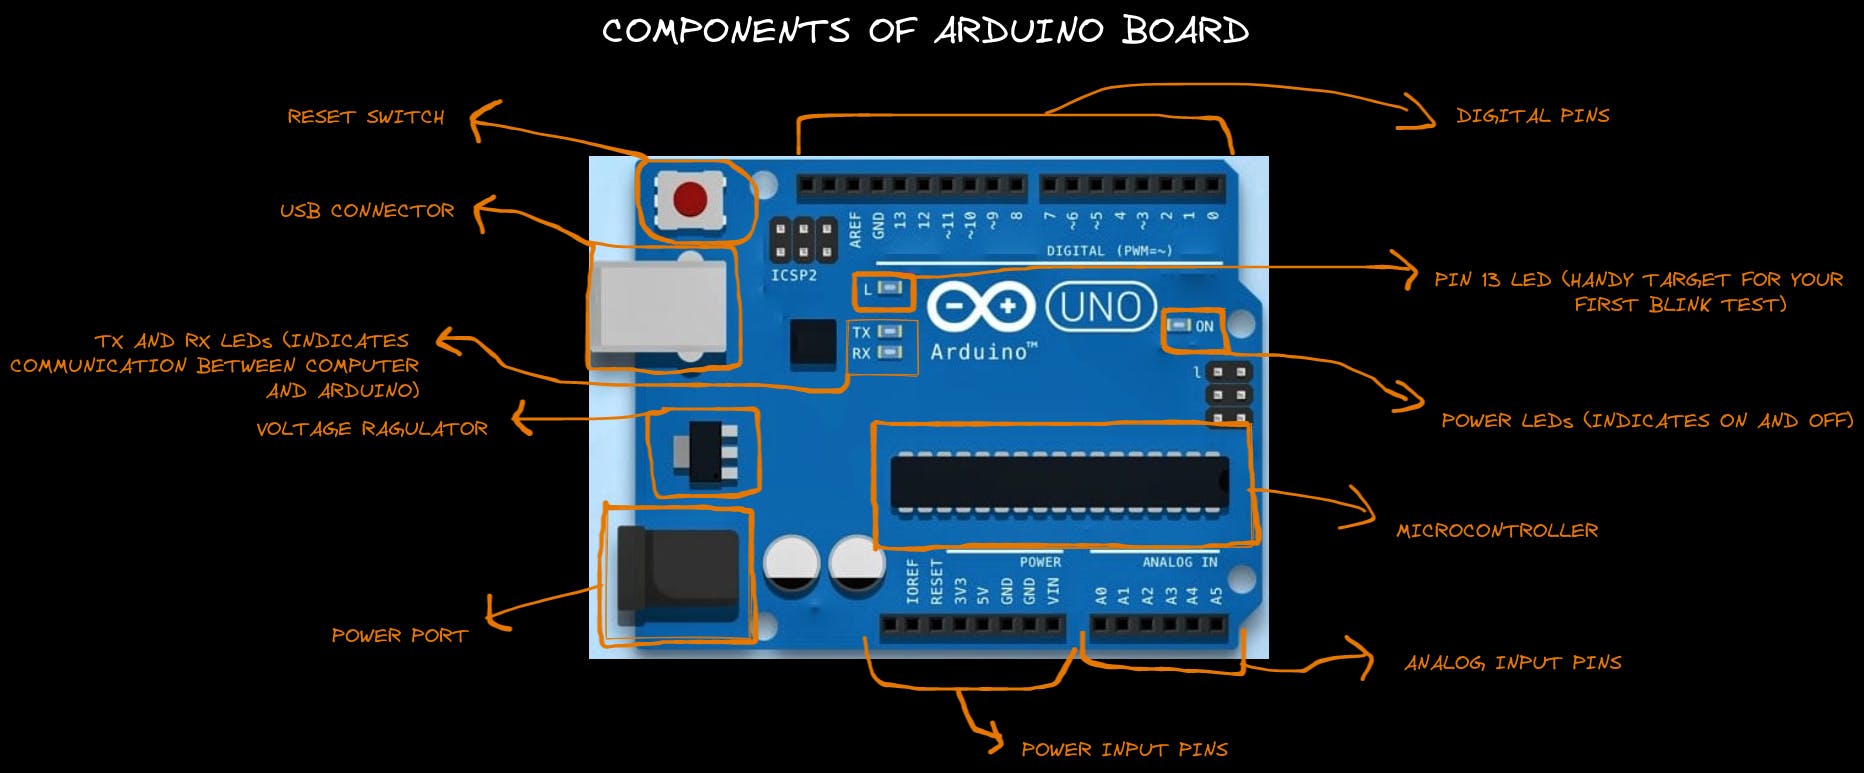
WHAT MAKES UP AN ARDUINO BOARD?
The physical hardware of Arduino is the board itself which consists of a variety of components containing different functionalities. The pictorial representation of the Arduino Board is given below.
TYPES OF ARDUINO
Various types of Arduino boards available in the market contain different compatibilities and functioning. Hereunder is the compilation of some of the most suited Arduino Boards for beginners! They are:
1. ARDUINO UNO REV3
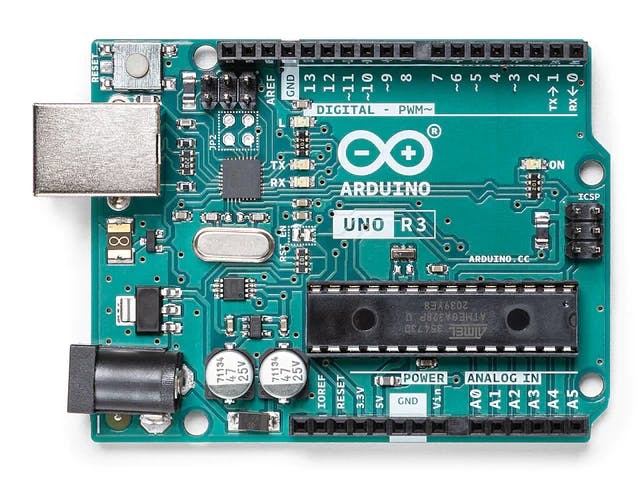
The Arduino Uno is the ideal board for beginners as it is your entry to the unique Arduino experience: great for learning the basics of how sensors and actuators work.
Arduino Uno Rev3 is the most used and documented board in the Arduino family. Many tutorials and projects are available online with instructions for you to get started.
It has 14 digital input/output pins (of which six can be used as PWM outputs), six analog inputs, a 16 MHz crystal oscillator, a USB connection, a power jack, and an ICSP header, and a reset button.
It contains everything needed to support the microcontroller; connect it to a computer with a USB cable or power it with an AC-to-DC adapter or battery to get started.
2. ARDUINO LEONARDO
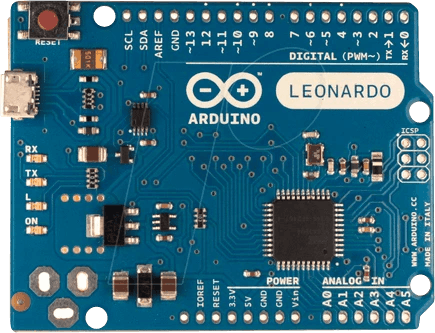
The Leonardo Arduino board is a Microcontroller board, and it is based on the ATmega32u4 data sheet. This Arduino board has 20 digital input pins, a 16MHz crystal oscillator, a micro USB connection, a RESET pin, and a power jack.
It has built-in USB communication, eliminating the need for a secondary processor. This allows the Leonardo to appear on a connected computer as a mouse and keyboard, in addition to a virtual (CDC) serial COM port.
3. ARDUINO RED BOARD
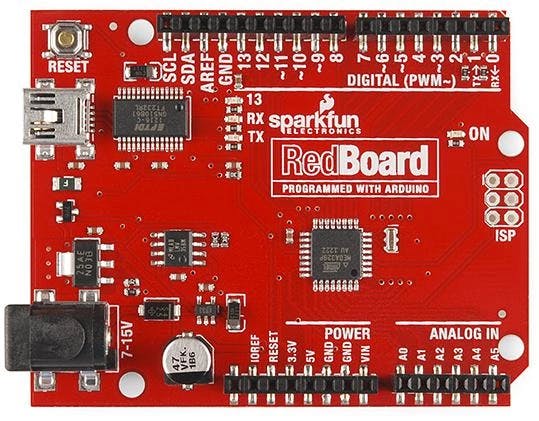
The Arduino red board is programmed by using the USB cable of mini-B with the help of Arduino IDE software.
Without any modifications in the security system, it works in all operating systems (OS). The Arduino red board is more consistent because USB and FTDI chips are used, and they are flat on the back.
It is effortless to create during project design. Just plug the board, select the menu option to choose an Arduino UNO, and you are ready to upload the program. You can control the RedBoard over a USB cable using the barrel jack.
4. LILYPAD ARDUINO
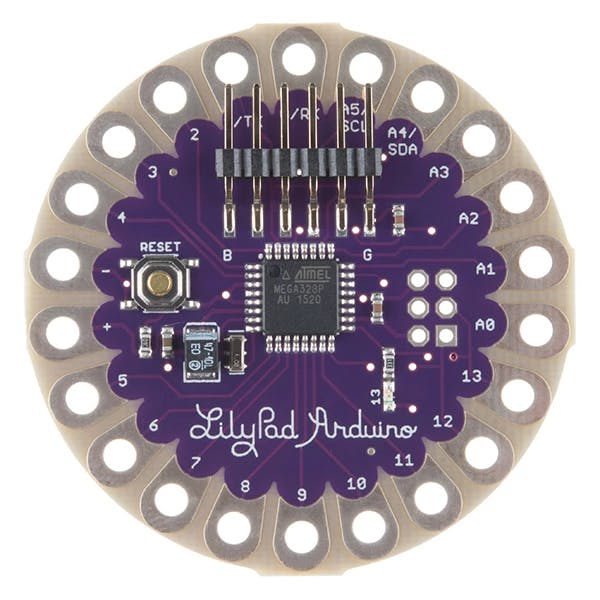
LilyPad is a wearable e-textile technology developed by Leah Buechley and cooperatively designed by Leah and SparkFun.
Each LilyPad was creatively designed with large connecting pads and a flat back to allow them to be sewn into clothing with conductive thread.
The LilyPad has its own family of input, output, power, and sensor boards explicitly built for e-textiles. They're even washable!
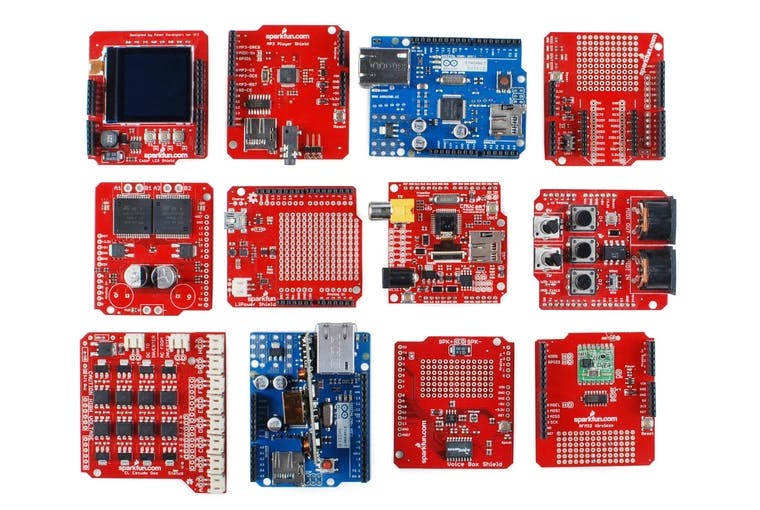
SHIELDS
Additionally, there are these things called shields -- basically, they are pre-built circuit boards that fit on top of your Arduino and provide additional capabilities -- controlling motors, connecting to the internet, providing cellular or other wireless communication, controlling an LCD screen, and much more.
ARDUINO CODING ENVIRONMENT AND BASIC TOOLS
After understanding the hardware of the Arduino Boards, let us now get started with Arduino programming.
Arduino code is written in C++ with an addition of special methods and functions. C++ is a human-readable programming language.
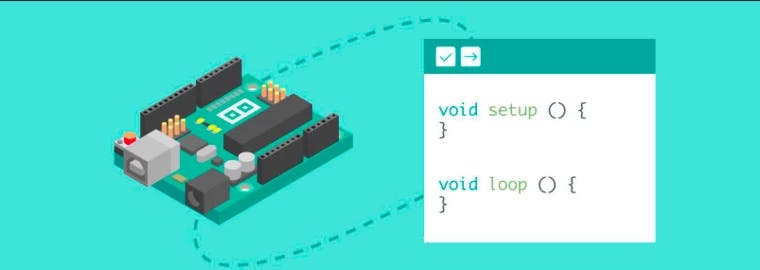
ARDUINO IDE
The Arduino Integrated Development Environment (IDE) is the main text editing program used for Arduino programming. It is where the main programmable code is written before uploading it to the board you want to program. Arduino code is referred to as SKETCHES.
Arduino IDE can be downloaded from here.
CODE STRUCTURE
LIBRARIES: Arduino has various built-in libraries which perform multiple functionalities. In addition, it is possible to import other libraries and expand the Arduino board's capabilities and features.
BUILT-IN FUNCTIONS :
Setup() Every Arduino sketch must have a setup function. This function defines the initial state of the Arduino upon boot and runs only once.
Here we'll define the following:
- Pin functionality using the pinMode function
- Initial state of pins
- Initialize classes
- Initialize variables
- Code logic
Setup() is also called Preparation Block.
loop()
The loop function is also necessary for every Arduino sketch and executes once setup() is complete. It is the primary function; as its name hints, it runs in a loop repeatedly. The loop describes the main logic of your circuit.
Loop() is also called Execution block.
For example:
  void setup(){
     //       put your setup code here to run once:
  }

  void loop(){

     //       put your loop code here to run repeatedly:
  }
Other functions include:
pinMode(): This function sets a pin as input or an output. You pass the pin number and the INPUT or OUTPUT value as parameters.
digitalWrite(): This function writes a HIGH or LOW value to a digital output pin. You pass the pin number and HIGH or LOW as parameters.
BUILT-IN CONSTANTS Arduino has various built-in functions:
HIGH: It equates to a high level of voltage, which can differ depending on the hardware (>2V on 3.3V boards like Arduino Nano, >3V on 5V boards like Arduino Uno)
LOW: It equates to a low level of voltage. Again, the exact value depends on the board used.
Constants used with the pinMode() function:
INPUT: It sets the pin as an input pin OUTPUT: It sets the pin as an output pin INPUT_PULLUP: It sets the pin as an internal pull-up resistor
The other constant we have is LED_BUILTIN, which points to the number of the onboard pin. It usually equates to the number 13.
In addition to this, we have the C/C++ constants true and false.
Below is the basic Adruino Program for "Blinking LEDs" which is somewhat analogous to "Hello World".
// Blinking LEDs
#define LED_PIN 13

void setup() {
    // Configure pin 13 to be a digital output
    pinMode(LED_PIN, OUTPUT);
}

void loop() {
    // Turn on the LED
    digitalWrite(LED_PIN, HIGH);
    // Wait 1 second (1000 milliseconds)
    delay(1000);
    // Turn off the LED
    digitalWrite(LED_PIN, LOW);
    // Wait 1 second
    delay(1000);
}
WHAT CAN THE ARDUINO DO? – ARDUINO PROJECTS

Various exciting projects related to Adruino are listed below:
- Arduino Robot Car .
- Arduino UNO Fingerprint Door Lock.
- Laser Tripwire Alarm Security System
- Traffic Light Controller
- Lie Detector Kit
HELPFUL RESOURCES
To help you on your journey in Arduino, here are some helpful resources that you can look at to get started and go further!
BOOKS:
- Getting Started with Arduino by Massimo Banzi
- Arduino Workshop: A Hands-On Introduction with 65 Projects by John Boxall
- Arduino Cookbook: Recipes to Begin, Expand, and Enhance Your Projects by Michael Margolis
WEBSITES:
- arduino.cc
- youtube.com/user/sciguy14
- github.com/arduino
- allaboutcircuits.com/projects/getting-start..
Follow MARS on GitHub, Hashnode, LinkedIn, and Instagram, Happy learning ✨